MT4 Position Sizer User Guide and Integration with MyFxPartner Analytics Console
- Position Sizer
- Rules
- Other features
User Guide:
Overview
The position sizer enhances your MT4 trading terminal by providing an intuitive, visual drag-and-drop interface which serves to completely replace the MT4 order window. This includes automatic calculation of volume, removing the need for third party volume calculators and manual data entry.
To show the position sizer; click on either the [P] or the [A] button at the top right of the chart. The position sizer appears as three horizontal lines; the entry line (yellow), the stop-loss line (red) and the take-profit line (green). An information panel also appears at the left of the chart displaying key information about the position and providing buttons for entering [Market] or [Pending] orders with a single mouse click.
To move any of the position sizer price lines, first select a line by double-clicking it. Moving the entry line will move all three lines in lock-step. When moving the TP and SL lines, if only [P] is pressed, the TP and SL lines can be moved independently allowing for any possible risk/reward configuration. If [A] is also pressed, moving either the TP or SL line will automatically move the other line with respect to the ratio specified under settings/auto-size ratio, allowing for a strict risk/reward ratio to be maintained.
Pressing [R] on your keyboard will reset the position sizer to the bid price or, if the bid price is not visible, pressing [R] will reset the position sizer to the middle of the chart.
Settings Overview
Position Sizer settings
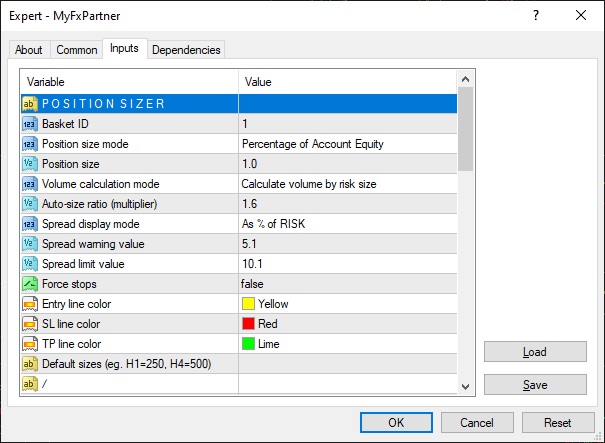
Basket ID:
The position sizer manages a basket of one or more trades in one direction only for the current chart symbol. If required, the Basket ID can be changed to manage a separate basket for the same symbol on the same chart or on a separate chart. The number of baskets is unlimited.
Position size mode:
1) Percentage of Account Equity: Dynamic position size calculated automatically.
2) Fixed amount in account currency: Fixed position size as specified.
Position size:
Specifies a percentage amount or a fixed amount in account currency with respect to Position size mode (above).
Volume calculation mode:
1) Calculate volume by risk size: Trade volume will be calculated by the risk size.
2) Calculate volume by reward size: Trade volume will be calculated by the reward size.
Auto-size ratio:
When using Auto-Ratio [A] with the position sizer, the auto-size ratio (multiplier) setting is used to calculate and automatically move the TP or SL line depending on which line you move manually. The calculation can be made risk to reward or reward to risk with respect to the Volume calculation mode setting (above).
Spread display mode:
1) As % of Risk: Displays the spread value as a percentage of the risk size.
2) As % of Reward: Displays the spread value as a percentage of the reward size.
3) As money value: Displays the actual spread cost in account currency.
Note: All three modes factor-in the trade volume.
Spread warning value:
If the spread exceeds this value it will be displayed in yellow. This value is either a percentage or a currency value depending on the Spread display mode (above).
Spread limit value:
If the spread exceeds this value it will be displayed in red and new market orders will not be allowed. This value is either a percentage or a currency value depending on the Spread display mode.
Force stops:
Set ‘true’ to force SL and TP stops precisely when the bid line price touches the stop line price.
Entry, SL and TP line color:
Specifies the line colors of the position sizer.
Default sizes:
Pressing the letter [r] on the keyboard resets the position sizer. If a default size is specified for the corresponding timeframe, the position sizer will reset using the specified size. This will be applied to the risk or the reward with respect to Volume calculation mode. If no value is specified for the current timeframe, a reasonable position size will be calculated automatically based on price range. Default sizes must be specified using the following format: H1=250, H4=500. etc. The size is specified in points (the smallest price increment on the chart).
General Options settings
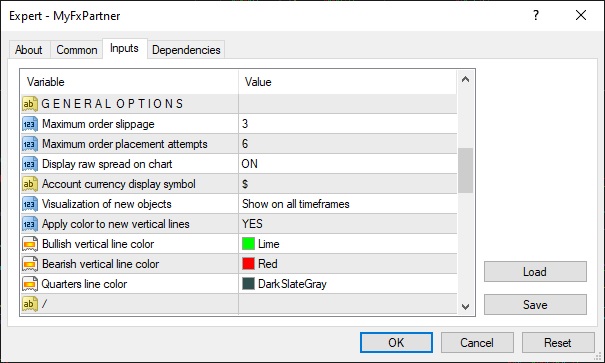
Display raw spread on chart:
The spread value is normally displayed at the top of the information panel when the position sizer is turned on. However, if you also need to monitor the spread when the position sizer is off, set this setting to ‘ON’ to display the raw spread value at the top right of the chart at all times.
Account currency display symbol:
If your trading account currency is one other than ‘$’, you can specify it here. This is for display purposes only – it does not affect any calculations. (Examples: €, £, ¥)
Visualization of new objects:
1) Show on current timeframe only: New chart objects will automatically be set to show only on the
timeframe they are created on. You can still change individual object visualization settings as usual.
2) Show on all timeframes: New chart objects will show on all timeframes (normal MT4 mode).
Apply color to new vertical lines:
Set ‘YES’ to automatically change the color of newly created vertical lines depending on whether they are created on a bullish or bearish candle.
Bullish/Bearish vertical line color:
Specifies the color for newly created vertical lines with respect to the setting above.
Quarter-lines color:
Specifies the color of the quarter lines which are turned on and off using the [Q] button at the top-right corner of the chart window.
Rules settings
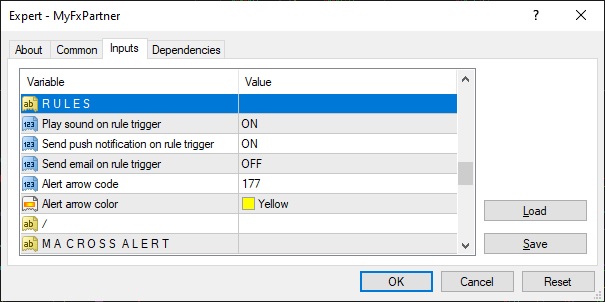
Play sound on rule trigger:
Set ON to play an alert sound when rules are triggered.
Send push notifications on rule trigger:
Set ON to send alerts to your mobile device(s) when rules are triggered.
Note: Push notifications must be enabled in MT4’s options (Tools/Options/Notifications).
Send email on rule trigger:
Set ON to send alerts by email when rules are triggered.
Note: Email settings must be configured in MT4’s options (Tools/Options/Email).
Alert arrow code:
A marker will be placed on the chart at the price and time an alert rule is triggered. By default this is a target/bull’s-eye symbol. For a complete list of available symbols search “MT4 wingdings”.
Alert arrow color:
Set your preferred color for chart alert symbols.
MA Cross Alert settings
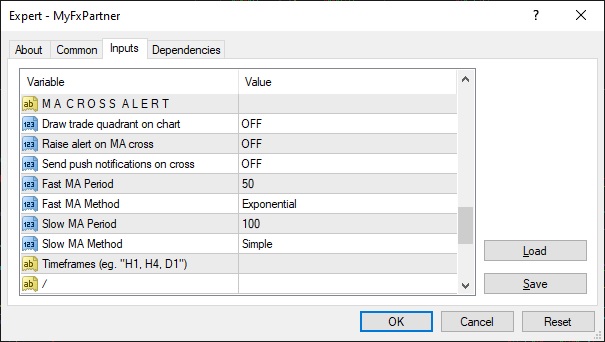
Draw trade quadrant on chart:
Set ON to demarcate on the chart where price is expected to move after the specified moving average cross.
Raise alert on MA cross:
Set ON to play an alert sound each time the specified moving average cross occurs.
Send push notification on cross:
Set ON to send alerts to your mobile device(s) each time the specified moving average cross occurs.
Fast MA Period & Slow MA Period:
Specify the number of periods used to calculate each of the moving averages.
Fast MA Method & Slow MA Method:
Specify the calculation method to be used for each of the moving averages.
Timeframes:
Specify which timeframes to display/raise alerts on the MA cross.
Valid timeframes: M1, M5, M15, M30, H1, H4, D1, W1, MN1
User Guide
Position Sizer
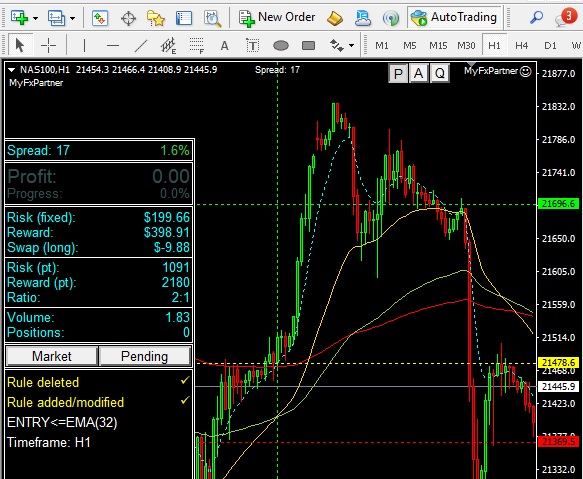
To show the position sizer; click on either the [P] or the [A] button at the top right of the chart. The position sizer appears as three horizontal lines; the entry line (yellow), the stop-loss line (red) and the take-profit line (green). An information panel also appears at the left of the chart displaying key information about the position and providing buttons for entering [Market] or [Pending] orders with a single mouse click.
To move any of the position sizer price lines, first select a line by double-clicking it. Moving the entry line will move all three lines in lock-step. When moving the TP and SL lines, if only [P] is pressed, the TP and SL lines can be moved independently allowing for any possible risk/reward configuration. If [A] is also pressed, moving either the TP or SL line will automatically move the other line with respect to the ratio specified under settings/auto-size ratio, allowing for a strict risk/reward ratio to be maintained.
Pressing [R] on your keyboard will reset the position sizer to the bid price or, if the bid price is not visible, pressing [R] will reset the position sizer to the middle of the chart.
Quarters:
Press the [Q] button at the top right of the chart to show or hide price lines for significant numbers.
Rules
Rules are defined in the description field of horizontal lines and trend lines. Rule definitions consist of the rule type (action) and the rule trigger (condition to take action). When a rule is successfully created, modified or deleted, rule summary and confirmation will be displayed in the trade information panel at the left of the chart.
Valid rule types:
ENTRY, TP, SL, TPN, SLN, TPO, SLO, LIMITORDER, STOPORDER, FOLLOW, ALERT
ENTRY:
The ENTRY rule can only be used with the position sizer and it is the only rule type that can be
used with the position sizer. Think of it as a dynamic pending order. This is ideal for entering after a retracement to
a moving average. When the entry rule is active the position sizer will follow the trigger
price until the bid price meets with it, at which point a trade will be entered at market price according to your
predefined position size. TP and SL lines can be adjusted while the entry rule is active.
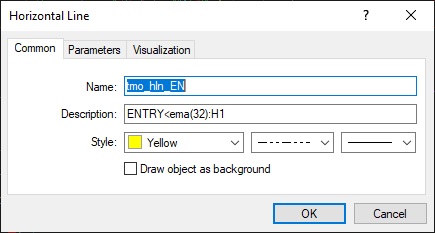
To create an ENTRY rule, select the entry line of the position sizer, right-click and choose properties,
enter the entry rule text into the description field, then click okay. If the order has been set up correctly
a confirmation will appear in the trade info panel on the left of the chart.
Examples:
ENTRY>SMA(20):D1
ENTRY<LBAND:H4
TP, TPN, TPO, SL, SLN, SLO:
TP = Take Profit, SL = Stop Loss. Adding the letter N or O to the end of these rules allows for a take profit or stop loss of only the Newest or Oldest
position respectively where a trade basket contains more than one position.
Examples:
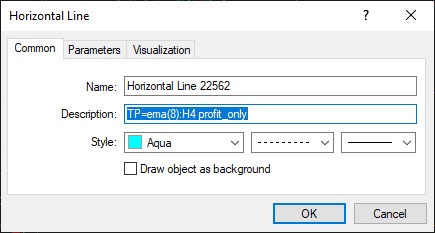
TP=EMA(8):H4 profit_only
TPN=EMA(8)+100:H4
SL=UBAND:H4
TPP, SLL:
TPP = Take Profit of Profitable - Close all winning trades in the basket (includes zero balances).
SLL = Stop Loss of Losers - Close all losing trades in the basket (includes zero balances).
LIMITORDER, STOPORDER:
Use these rules to add more positions when already in a trade. Use [square brackets] to specify
volume. If volume is not specified then the volume of the original position will be assumed.
Examples:
LIMITORDER=SMA(50)+1000:H4
LIMITORDER=LINEPRICE
STOPORDER[0.5]=LBAND:H4
STOPORDER[1.0]=LINEPRICE
FOLLOW:
Follow is essentially just a dummy rule allowing you make a horizontal line follow a moving price.
This can be useful for keeping an eye on a certain moving average price on a different timeframe
etc. Nothing happens when the bid price meets the follow price.
Examples:
FOLLOW=EMA(8):W1
FOLLOW=UBAND:D1
ALERT:
Although MT4 already provides some basic alert capabilities, using alert rules with MyFxPartner
allows you to set alerts that will trigger on dynamic prices such as a moving average. When the bid
price meets the alert trigger an alert will be raised according to settings specified under RULES in
MyFxPartner’s settings. When an alert is triggered the alert rule line will be deleted and an arrow
object will be placed on the chart where the alert occurred.
Examples:
ALERT>UBAND:H1
ALERT<LBAND:H1
ALERT<SMA(100):H4
Other Features
V-LINE TRACKING BETWEEN TIMEFRAMES:
To automatically move the chart to track a Vertical Line when switching between timeframes simply ensure that the chosen V-Line’s visualization is set to show on all timeframes and that it was the last object clicked. You will also need to disable automatic chart scrolling as shown here.